Updating an iMac 27″ EMC 2546

Back in 2013 when my oldest son was 10 years old I wanted him to get into computers. He had already started gaming but the responsible thing seemed to ever-so-gently nudge him towards development and the world of creating your own applications. As I was already a converted Apple-fan (from Linux) the best choice was an iMac that everybody could use. A good sized screen of 27 inches with plenty of ‘real estate’, a hard drive to hold it all and RAM to last all the way (8GB).

Well, he did get a lot of ‘milage’ out of it but in the end he was more interested in serious gaming and that meant getting him on a Windows platform a couple of years later (much to the dismay of his father, but hey…). With that, the iMac was now going to my oldest daughter – not a gamer but not really interested in computers either. And she was – and is – able to do most everything with her smartphone!

So, there was basically an “orphaned” high quality desktop computer ready to be put to use. A little dated but working and running Mojave without sweating too much. Ok, it could definitely use more RAM but can you ever get enough of that? My primary work station is a laptop but at home it becomes pretty stationary and not as flexible as I would have hoped – in other words, sure, it would be great to have a desktop computer!

That’s when I cleared a very cluttered desk and made preparations to get started on this “new” machine – just gotta pick it up from upstairs and bring it down, hit the power-button and get started… not! Damn thing won’t boot! Well, it starts, plays the tune and then turns off again. It’s broken! Nothing! A six year old iMac headed for the eternal pasture?! Over a faulty hard drive! Damn!

Not my first repair rodeo

Well, we couldn’t have that so I rushed to ifixit.com where I’ve ordered from in the past: A replacement screen for the aforementioned Macbook which I smashed when closing the lid over a toothpick and then more recently replacing a broken iPhone screen. Yeah, I’m a pretty good repairman and if I can fix something as fiddly as a Macbook and iPhone of course I can fix a big ole iMac!

But why not take the opportunity to get some much needed upgrades in and extend the life of this trusted old computer? There’s a hard drive replacement kit that includes a SSD and since I’m waiting for the kit to arrive (from Stuttgart, Germany) why not upgrade the memory and go for the full 32GB that the iMac can support?!

It all comes at a premium but this is a premium computer and it’s worth it to keep running – no other brand will give you value like this over so many years and everything (else) works so I ordered the components: Replacement kit (the 500GB option to replace the 1TB HDD the was faulty) that included all the tools and spareparts needed from ifixit and 4 x 8GB RAM (Crucial DDR3L PC3-12800 204-pin) from Proshop in Denmark.


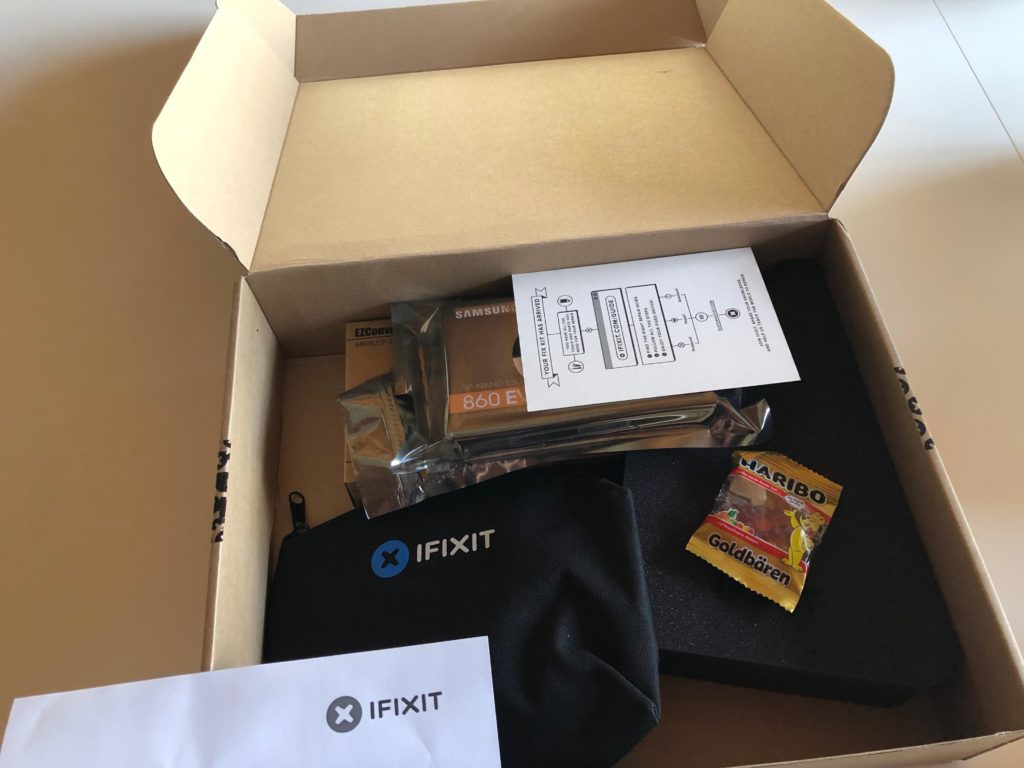
The box with tools, hard drive and gummy bears(!) from ifixit

After a couple of days all parts arrived and I was ready to get cracking on the upgrades. The RAM was easy enough as it only required moving a small hatch on the back just below the power cable. When power cable is removed a small tap can be pressed inside the “ring” and the hatch releases. True to Apple engineering prowess the memory banks are accessible after moving a lever giving easy way to remove or install modules. Quick and simple fix.

Next up is the complex operation of opening the darn thing, removing old hard drive, installing new, testing and then assembling everything back! There are no screws but only adhesive sticks along the edge of the screen so no room for mistakes – get this right or it can’t be reassembled. With stakes high the repair guide was whipped out and the classification of “Difficult” was just an extra motivational factor. I got this!

Cracking it open

Using the roller-cutter supplied to release the screen from the casing was quite simple. The tool supplied was just the right size to cut the seal of the adhesive strip but a little bit of wiggling was necessarry.
I would recommend doing this part on a soft surface in case the screen slips and falls. Getting the whole thing opened revealed that a good cleaning was way overdue. Be careful when sticking vacuum cleaners, fingers or anything else inside delicate electronics as static electricity will kill it.


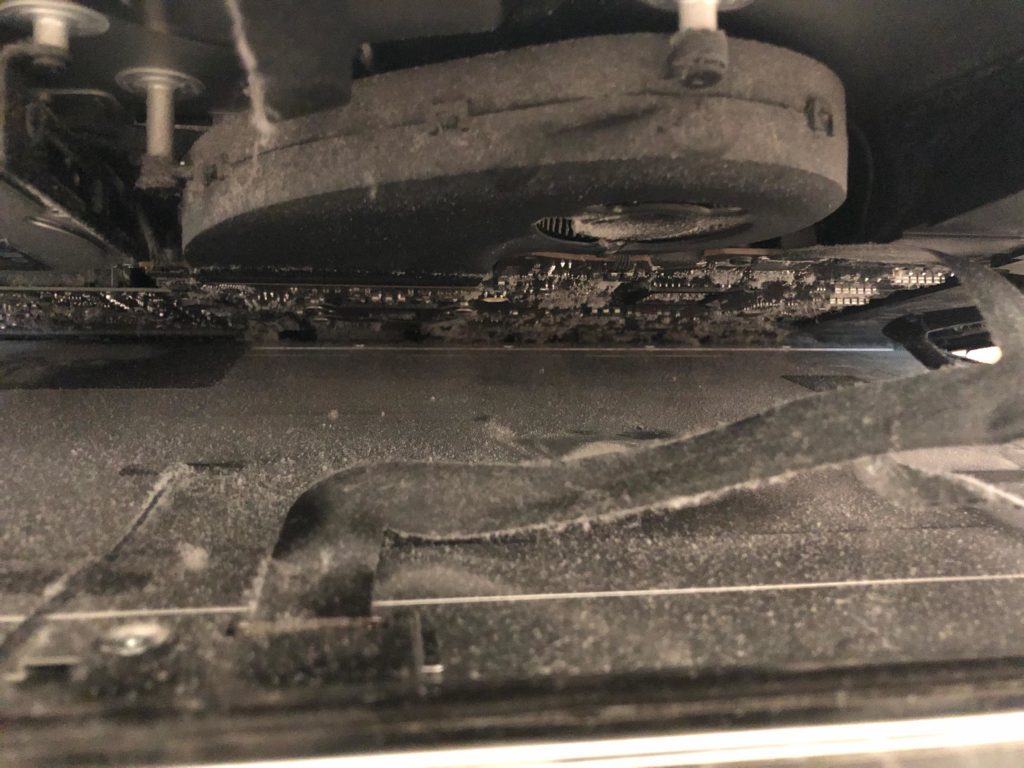
Plenty of nasty stuff after six years – removed carefully with vacuum cleaner and anti-static towel

Just two small connectors keeps the screen attached to the rest of the machine and as per usual it’s really fiddly and really delicate. Be very careful when detaching the connectors – not only can they break but poking around in the guts is an ESD-risk. Static electricity is a nightmare.

Since everything is held together by adhesive strips and not “inter-locking” metal bits you really need an extra pair of hands just in case. My oldest son was really helpful when taking this apart and at 15 he’s a “dust afficionado” judging by the state of his room…

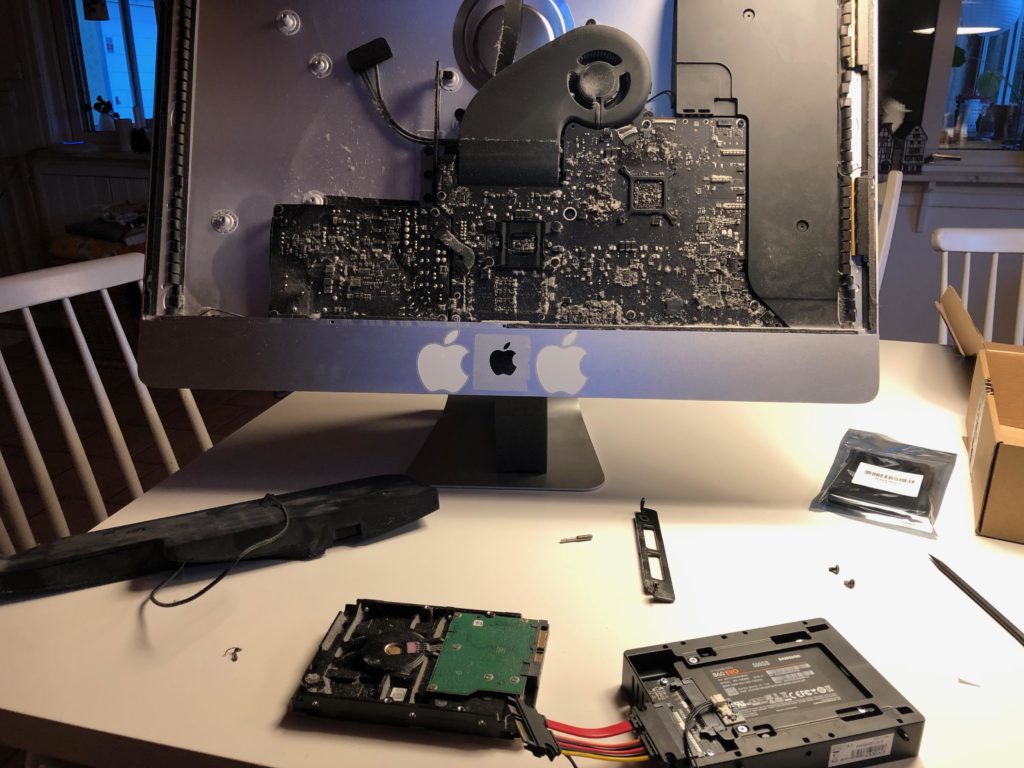
Preparing the new SSD-disk for assembly, cleaning the inside

Moving the speaker and getting access to the disk was surprisingly easy. Never forget to go gently and triple-check that all wires are out of the way. Patience is so important as there are really a lot of sensitive stuff – but the build layout and -quality is very good so taking your time is well spent. The disk is not screwed in but suspended in brackets, one on each side so be careful when you take things apart or the disk will easily slip.

The connection cable is just the right length so when installing the new hard drive be careful and plan how you want the connector to go. There’s a temp sensor that goes in between to consider but the ‘wiggle room’ is just enough for it all to fit.

Making a list, checking it twice…

Biggest issue is that you really only have one shot at doing this right. If you’re not certain order some extra adhesive strips from the beginning – and if you’ve never opened a Mac before it can seem a bit intimidating. It is not that difficult, just time consuming and requires attention. Here’s my own little checklist for getting this done right the first time:

  • Make sure you have a couple of hours blocked out for doing this
  • Have all the tools readily available – all comes with the package deal from ifixit
  • Glue-removal. I use a bit of acetone (nailpolish-remover) on a q-tip for the residues around the edges
  • An extra pair of hands on call – have someone in the next room or so ready to assist

Getting the screen back in place was definitely the most sensitive part as all the old adhesive strips needed to be cleared off before you could reassemble things. Make sure you take extra special care when removing and don’t rush it! First do the screen and make sure you get it all off with a little acetone or similar. Then repeat on the body of the computer – this is where the replacement adhesive sticks go so check it all and check it again.

When you apply the new sticks be very careful – you have one shot at this and it sticks the first time you try. Measure twice and cut stick once! Follow the instructions and you should be fine – especially the part of putting the screen back on can be challenging as you need to make sure the two cables are reconnected before removing the “glue protection”. I did as adviced and fired up the mac while just having the screen secured with masking tape and that was a good thing! Turned out I hadn’t fitted the screen connection cable just right and no picture!


Secure the screen with masking tape and test that everything works before finished the reassembling!

It was easy to remove the masking tape and take a second look inside to make sure that all connectors were firmly connected. Tried to fire things up and hey presto, it worked! I had installed the 32Gb of RAM earlier and now I could reinstall the MacOS (Mojave) to the new disk in a matter of minutes rather than hours. About 45 minutes after the picture was taken the iMac was back to normal with all systems go – and much quicker than before.

With a clean bill of health I could gently remove all the adhesive protections from behind the screen (small pieces stick out) and give a little push on the screen so make it really stick. The operation was over and the “patient” is better than ever!

In conclusion

I’m very impressed with this seven (7!) year old iMac – it still runs very well and with a faster disk and more memory practically indistinguishable from any newer model. Most work is not that CPU-intensive so I rarely hit any limits with processing power.

One other limit though is the screen: I have attached a 4K monitor and it will run 1080p at a reasonable refresh rate but no higher resolution – at 4K it’s 30Hz and my eyesight is not good enough for that.
Besides that, it runs like a charm and have quickly become my new primary work station.

Disable all contrib modules in Drupal 8

If you for some odd reason should need to disable all contrib modules in Drupal 8 in a sweeping motion, you could do with Drush:

Start by getting a list of all modules, that…

  • are enabled
  • are not in core
  • get the machine name
  • and put it all in a file
$ drush pml|grep Enabled|grep -v Core|awk -F"[()]" '{print $2}' > modulelist.txt

Then we put a drush command ahead of every module name and put it in a new file

$ sed 's/^/drush pm-uninstall -y /' modulelist.txt > disablecontrib.sh

Make it executable, fire away and Robert’s your mothers brother.

$ chmod +x disablecontrib.sh; ./disablecontrib.sh

Not elegant but fast and effective.

How to update Babystar firmware

The present version of Babystar D-STAR hotspot is v. 1.04 and can be downloaded from the ON8JL website.

To update the hotspot with MacOS you can try and do what I did:

  1. Open the hotspot (screws on the underside)
  2. Attach the accompaning USB-cable to the three-pin serial-port
  3. Attach the USB-port and confirm that the port is created.
    Mine was called /dev/tty.usbserial-FTGXOC3V but milage may vary.
  4. Install Homebrew by following the instructions on the website
  5. Install Minicom with “brew install minicom”
  6. Install Ymodem (file transfer protocol) with “brew install lrzsz”
  7. Start Minicom with “minicom -s” which brings it into config-mode
  8. Under “File transfer protocols” change the filepath to Ymodem send files (under B) to “/usr/local/Cellar/lrzsz/0.12.20/bin/lsb -vv” and change recieve files (under E) to “/usr/local/Cellar/lrzsz/0.12.20/bin/lrb -vv”.
  9. When attached to the hotspot go to menu and choose Send files, then Ymodem and then choose the file.

It’s still alive!

It’s been ages since I last updated this blog and that’s a bit of a shame. Not because of lack of ideas for topics or posts but mostly lack of time – or more correctly, a lack priority. Hopefully this is about to change since there’s plenty to write about and document.

This is just to confirm that although the blog is a bit stale it still hasn’t reached “best before” date – and I will be updating these pages soon.

So stay tuned! More to follow!

A foreigner in LA

I’m at work right now and as many times before that means traveling. Not that I mind that at all. In fact, with winter full on at home with temperatures around freezing and practically no sight of sun it’s quite nice to spend some time in a more hospitable climate.

20160305_080756

Not to mention, a taste of the big city although is becomes clear that I’ve become accustomed to living in the country – but not surprising the contrast is clear between a small village in the Scandinavian countryside and one of the worlds most iconic metropolis’ Los Angeles.

Came here for the first time a year ago and now on the 5th visit – this time longer than anytime before since I’m staying for a month (33 days to be exact). That’s a month of sunshine, meeting old friends, working with great colleagues and plenty of new experiences – it’s impossible to stay here without something not planned happening. Anything else is would be odd in a city of roughly the same population as all of Scandinavia combined.

Just another day at the office
A “winter” day in February in Los Angeles

But of course it’s not all fun’n’games. Being far away from home and family takes it’s toll and not having your own bed to end the day in adds a bit to the stress of traveling. All this – though – is a small price to pay I must say. The challenge and adventure is more than enough to outweigh the negative and five weeks fly by quite quickly.

Posting via mail

WordPress is pretty cool – you can mail your blogposts in and get them published automatically. And if you – like me – really like your mail client for writing and editing it couldn’t be easier 🙂 Give it a twirl! I use Postie and that’s a recommended module.

So, what’s happening?

I’ve made a few updates to the system and did some ‘house-cleaning’ so maybe this time I can start to blog a bit more.

As of now the overall language is English but there will be posts in Danish and even Swedish. It’s hard to be multi-lingual when most tools are only built for one language at a time – and support for more languages is only possible through shaky 3rd party add-ons. Well, let’s see how it goes – the new Drupal 8 has best-in-business support for multiple languages so I might change to that soon – so far, I’m going with WordPress.

See you in the comments.

How I Learned To Love Agile

Ok, I’ll gladly admit it – I was never very fond of ”process methodologies” or any fancy way to describe how, why and when I should do my work. A little childish perhaps and probably not very professional. So there, I’ve said it.

But I never was a very normal developer. Not even normal. Or developer.

From the middle of the 90’s and onwards I went from one project to the next. Never really did what it said on my business card since I always had a weird ability to get involved in all sorts of projects across many different parts of the organisation.

For me, developing code was merely a weapon in the arsenal but not a skill that I had the luxury of dedicating myself to. The days were putting out fires or – in rare occasions – having days to come up with an urgent solution to whatever challenge ”du jour”. Once in a while a project manager would pop his/her head in and talk waterfall/Gantt-chart, everybody would nod and then go about their business.

Was it stressful? You bet (mostly benign).
Was it fun? Almost always.
Was the customer happy? Oh, heck yeah!

Did it feel good to always churn out one-off’s with next to no option of optimizing/refactoring/improving over time? Not even close – and no amount of documentation can erase the fact that quality was always the lowest priority.

When I finally got around to focus on development, that was also when I was more than ready for structure and some form of common practice. This was absent in almost all of my previous experience, except for some homegrown methods of pushing paper and blame around. No, a framework of tools setting standards, boundaries and allocating resources was what was needed – and I was willing to take anything!

And then I got in the first project a handful of years ago where I got the first taste of ”agile” and ”scrum” – oh, how it did sound good on paper and how it did feel like the right way to do web development.

So we went to work. And planned. And developed. And did the standups in the morning… for hours?! And looked at waterfall-charts. Because even though scrum sounds nice, it may be a little too much. So the organisation cherry-picked the harmless bits and left the actual working components. Like trying to get the square peg through the round hole and not noticing the obvious incompatibilities. I didn’t renew the contract when it ended.

Next project shortly after seemed much better – I was more focused in terms of technology and the organisation was really keen on scrum. Alright, my enthusiasm may have cooled quite a bit but I was still open to see if we couldn’t get it right this time. So we talked scrum. And then we talked some more. And – OMG, as the kids say – did ”scrum” go down in epic flames.

If the previous project cherry-picked from the toolbox, this was more like a hideous remix of completely misunderstood concepts with only a faint resemblance of agile. We’re talking zero definition of roles, ”scrum master” with megalomania, information-indigestion and oblivious management – a tale of good intentions going from bad to toxic in a very short while. And an obvious reminder how important the work climate is for productivity.

So once again, I didn’t renew the contract.

Fast forward to today and on to my current project. It’s fair to say that when joining X-Team I had a “love/hate”-relationship with scrum… just without the love. I was very cynical and even so it seemed incredible that it really couldn’t be done right – is third time a charm, possibly?

And then the shock: from Day 1 with X-Team, I got involved in the daily scrum, participated in the obligatory milestones from sprint startup to finish. And it worked! And I was a convert – was it really this simple? Is it really this efficient in real life and can it deliver on the promises?

I would say so, yes. And I went from being very dismissive about scrum having seen it done so wrong so often that I had almost given up hope that it could be done right – until X-Team.

Now I’m part of a big team spanning numerous vendors and our primary partner. Many different roles from backend to front-end, with operations and testing thrown into the mix – a huge potential for slow turning wheels and an ever-growing backlog.

Besides a well-planned foundation at the beginning of the project and a thoroughly trained organisation I would attribute the amount of discipline and motivation as the most important factors to the success.Discipline meaning that we try our hardest to stick to the scrum manifesto and even if we may add our ‘own flavor to the sauce’, it’s still generic enough for new developers to get accustomed to the process very fast.

This brings motivation when everybody involved can see that the project methodology actually makes our lives easier, enhances productivity and gives clarity and transparency for all. Today I’m an avid fan and added a “scrum master” certification notch to my belt not so long ago – something I had not thought possible before.

In closing, thanks for reading this far. To sum up my most important points about scrum, how to implement and how to practice, I’ll leave you with this small list.

SO SHOULD I EVEN USE SCRUM/AGILE?
Yes, definitely. It’s actually hard to do it wrong and almost requires conscious effort to eff up. That said, “some assembly required”.

WHAT ARE THE BIGGEST PITFALLS?

  • Cherrypicking!
    Don’t do it. Unless you’re super-hardcore-experienced-scrum master you stick to orthodox scrum and stick hard. Do it right, or don’t do it.
  • Implement without training.
    I don’t even know why anyone would do this – if you expect some sort of snake oil you’re sadly mistaken. Implementing scrum is painstaking, time consuming and hard.
  • Giving up.
    So you’ve done a couple of sprints and the results are not anywhere what you expected? Management breathing heavily in the background? Pressure is mounting and action is required so scrapping everything and going back to “your old ways” could calm The Brass and get development back on right track..?
    Don’t fall for the temptation. Stay calm and scrum on. Maybe you need outside help, freeze production or something else but there was a reason you shifted to scrum/agile in the first place – it may not come instantly but it will come.

PS. Chronology and certain events have been altered for dramatic effect/to make a point/to not drag it on forever/paint with a broad paintbrush(?).

New gear on the way

Put in an order with Wimo yesterday… first new purchase in ~10 years and, man, has things changed!

Main reason is that I commute a lot on a daily basis (approx 230 km return-trip) and why not spend the time right? 🙂
I’ve been quite keen on APRS for ages but never really got familiar with it – started with UI-View and Igates, later over TH-D7 which seemed like an easy way in but somethings wrong with the radio (the plug for GPS) and I never got around to fixing it.
Now you can get a mobile station with the GPS build in so there’s the nice boxed solution I could use – ordered the Yaesu FTM-350 and it’s like the days before christmas!
Will be sure to update with the progress when it arrives.

Oh, and second reason was a hefty 20% discount from the store 😉 Thanks, Wimo.